Write Up Reverse Engineering — HTB Apocalypse 2023
Introduction

A few weeks ago, I participated in the CTF HTB Apocalypse 2023, which ran for five days and included a total of 74 challenges.

In this write-up, I will cover the reverse engineering section. All files for this CTF can be downloaded here, thanks to mas yuuna#4173 on discord. Lets start
Table of Content
· Introduction
· Table of Content
· Shattered Tablet
· She Shells C Shells
· Needle in a Haystack
· Hunting License
· Cave System
· Alien Saboteur
· Gimmick DSP
· Vessel Cartographer
· Somewhat Linear
· Analogue Signal Processing
· Epilogue
Shattered Tablet
In this challenge, there are binary “tablet” that asks for input.

Decompiling the binary reveals the following code:
The input is compared byte-by-byte, but the sequence of comparison is randomized. To solve this, I used a simple assignment to the array and manually fixed the flag.
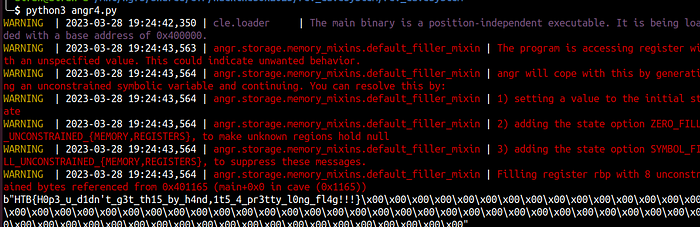
Other solutions exist for solving this challenge. Since the comparison is simple, angr can be used to automate the solution. Below is my solution using angr:
Below is output when running script with angr:
Submit the flag on the platform and we should get the first flag.
She Shells C Shells
In this challenge, there are binary “shell”. Running this binary prompts for input when entered command “getflag”.
Below is code of function “func_flag”:
The function includes a simple XOR and comparison function. The following code retrieves the password and flag:
Compile and running this code would show output below:
Although the decryption still shows garbage output, we can still obtain the flag by providing the password to “shell”.
Needle in a Haystack
In this challenge program only show random string. Below is main function of this challenge:
A random integer is generated, and a random value acts as a string pointer on the data segment.
If we examine the data segment, we should see the flag hidden within it. Submit the flag and we got the point.

Hunting License
On this challenge, program would ask input for few question.
Below is exam function of challenge “hunting license”:
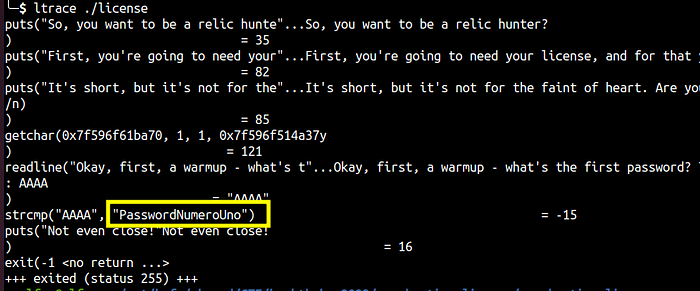
Looking at the code, we can see the strings “PasswordNumeroUno” and another password. The second password can be acquired by examining the data segment, where the string “0wTdr0wss4P” needs to be reversed based on line 19.
All comparison functions used strcmp on the libc. On Linux, there is a tool named “ltrace” that hooks all calls to libc functions.
Run program with ltrace and we would get all the password
First pass
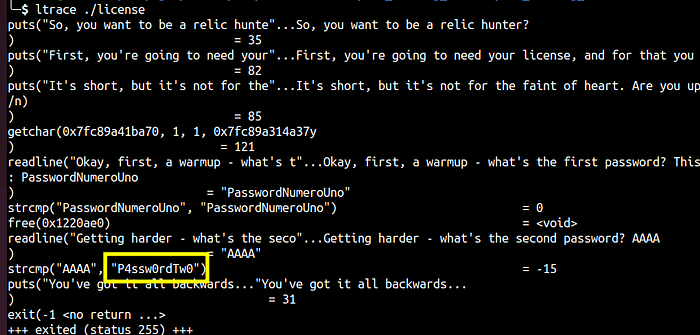
Second pass
Third Pass
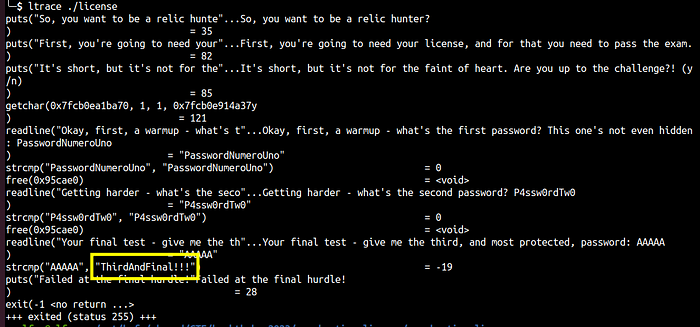
Input all the information that we already required on the server and we got the flag.
Cave System
The “cave system” challenge is similar to the “tablet” challenge but more complicated with more constraints.
Below is main function code:
Due to the code’s complexity, I attempted to solve the challenge using Z3 but encountered failure when decoding the constraint. However, this challenge can also be solved with Angr, which makes obtaining the flag easier.
Below is solver code that using Angr.
Run the script and flag acquired
Alien Saboteur
The next challenge was “Alien Saboteur”, which was my favorite challenge in this CTF. This challenge requires reverse engineering virtual machine code.
Two files are provided, named “vm” and “bin”.
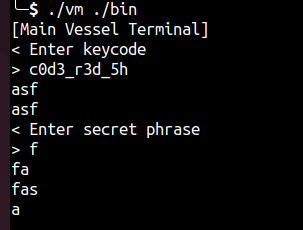
Executing the “vm” binary with the argument “bin” prompts for user input.
Below is main function code
From main function, we should see that program would read argument files and seek 2 bytes from stream that contains header UWU. After read the files, program then call vm_create.
Below is function vm_create code:
In “vm_create”, the program initializes some memory allocation and copies the VM machine code to memory.
Below is function vm_run code:
In “vm_run”, the program loops the “vm_step” function on the argument, which is the machine code.
Below is function vm_step code:
This function is the most crucial code in this VM emulation. In this code, the program inspects the bytecode and runs the instruction based on the offset “original_ops” and passes the rest of the memory as an argument. The following opcode is specified in the binary:
Many instructions are defined in the vm binary. The following is an example of an instruction named “vm_cmp”:
“vm_cmp” has an argument “a1” that is compared with an argument and sets a specific memory that acts as a flag register with 1
To understand how machine code is formatted in the binary, lets inspect “bin” files with hexdump.
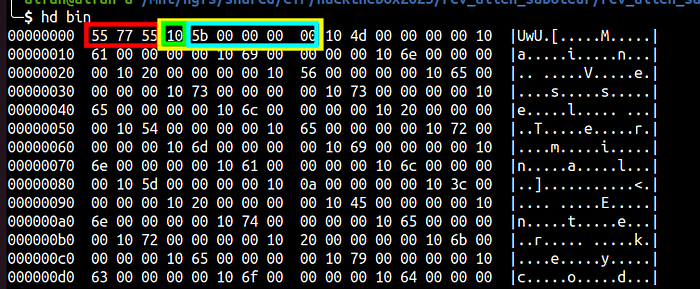
We can see that the first three bytes are a header, and every instruction takes 6 bytes, with the first byte on the green block (0x10) as the instruction command (opcode) while the remaining five bytes in the blue block act as an argument (destination and source for every command).
To analyze the machine code more efficiently, I developed a Python script to parse the “bin” files, enhancing readability. Below is the Python code for parsing the “bin” files:
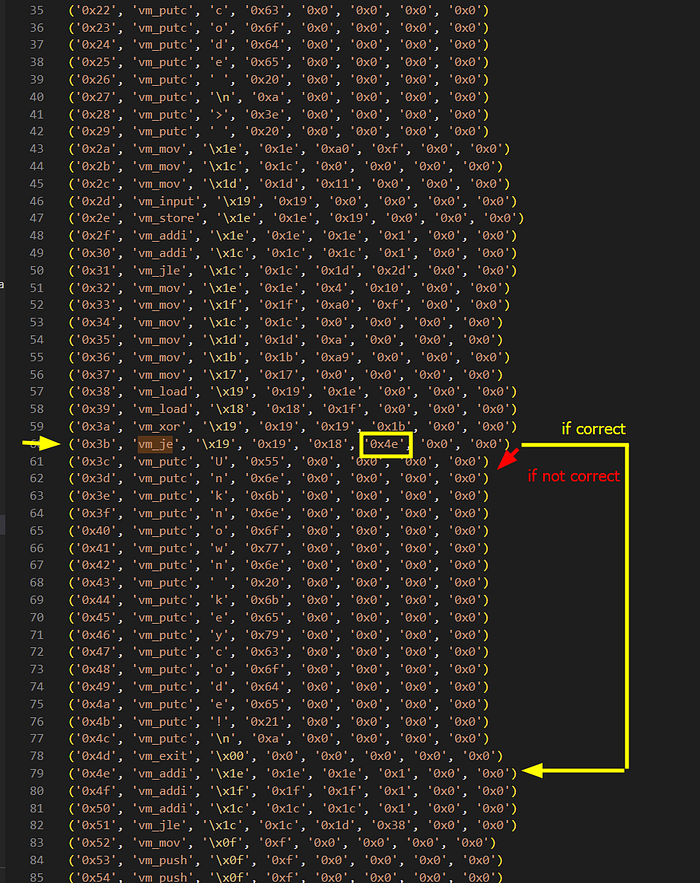
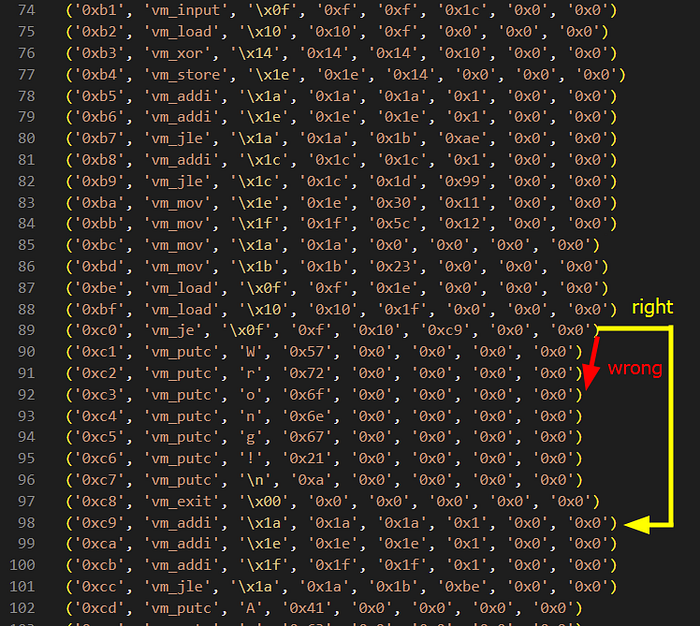
Run python script would show the output below.
There are many instructions executed in the “bin” file. In the output, we can see that the program executes “vm_je”. If we look at the code, this function compares the argument and jumps if the data matches.
Below is code for “vm_je”:
If we look at the instruction below, the program jumps to the instruction at 0x4e if our guess succeeds, meaning our input will be compared here.
After I understood this behavior, I created gdb script code to debug execution at the address at 0x000055555555570B and got the value compared ($rbp-0x04 and $rax), setting the value on $rbp-0x04 to $rax to continue the execution.
The following is the gdb-script output of the script:
Finally, we get the string “c0d3_r3d_5h”. However, if we input the string into the binary, the binary still asks for the secret input, which means our job is not yet done.
If we look at the disassembly instruction, we did not find the string “Enter secret phase,” which means machine code somehow got modified.
If we look at the hex of the binary, we can see why this happens. The following is the hexdump of the “bin” files:
In the “bin” files, at address 0x000002c0+13, the binary has a different character set than the bytes before the address. Let’s look at the instruction below:
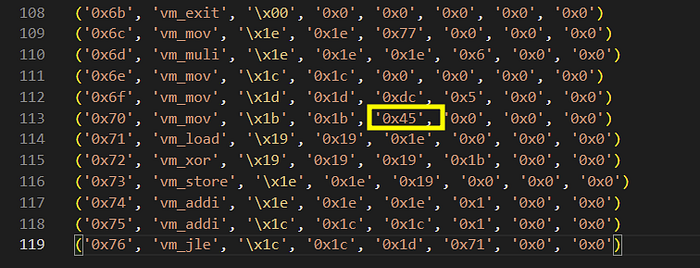
In the instruction, the program XORs the self-code by 0x45. To decrypte and unpack the code, I created the following python script.
Run the decrypt-shellcode and now run parsing code to new generated binary would able to see another segment code.
Now we have an extended instruction that unpacked after we input the first password. If we look at the code, the program is still using the same “vm_je” and the same “logic” as the first phase. But why did the program exit?
To trace this, I created a gdb script that maps our character to another character and saves it in a dictionary in case our input is modified to something else.
Running the script generates the dictionary list. If we look at the end of the hexdump, there are some characters that are unique and indicate the encrypted flag.
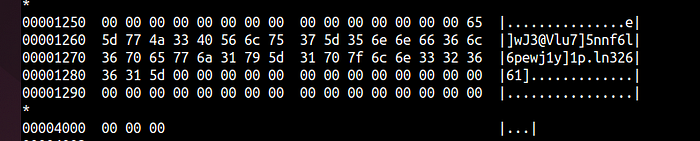
Now that we have the encrypted flag and the mapping dictionary, let’s convert the encrypted flag back.
However, when running this script, the solver still does not show the flag correctly. Below is the output of the script:
The output still does not show anything meaningful. However, all the characters that I got are printable, and we got a few characters that are supposed to be the flag, such as H, T, and B but in random positions

Because the flag is in a random position, I tried to create a script to map every location. To do this, I used some side-channel attack. I input the character “A” with a count of 100, but with the character “B” on the first sequence, so I input “BAA…”. Then I checked where the location of B would be. From the dictionary on the first attempt, we know that A would be mapped to C, and B would be mapped to @, so the final map location is 0 => (character @ location).
Below is the gdb script to implement that logic:
Running the script for few minutes, we can get the dictionary for the flag position. Combining this with the first script to convert the flag will show the correct output.
Running the script should give us the flag in the output.
Gimmick DSP
In this challenge, the provided binary files are “flag_generator” and “flag.wav.” The “flag_generator” binary is built with GraalVM, and I did not find a way to debug native Java code. I only found that a few strings were defined in the data segment but did not find any usable code to debug the calculation.
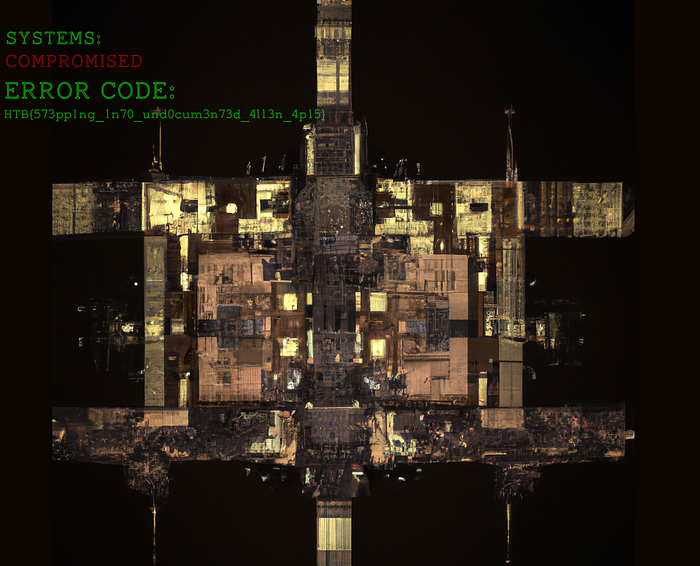
After trying a few approaches, I tried to black-box the audio files and reverse the audio. After listening a few times in parallel with modifying the audio amplitude, I found part of the flag:
HTB{*1*_y0u_bl@ck_b0x_th1s?}After guessing a few characters, my team came up with the flag HTB{d1d_y0u_bl@ck_b0x_th1s?}, submitted it on the platform, and got the flag correctly.
Vessel Cartographer
The next challenge is “Vessel Cartographer”. For me, this is the hardest rev challenge in this CTF, instead of last one.
Two files are provided for this challenge:
From the provided data, this seems to be some kind of ransomware challenge.
If we look at the code, the decompiler shows that the binary cannot be decompiled successfully because it is packed with UPX.
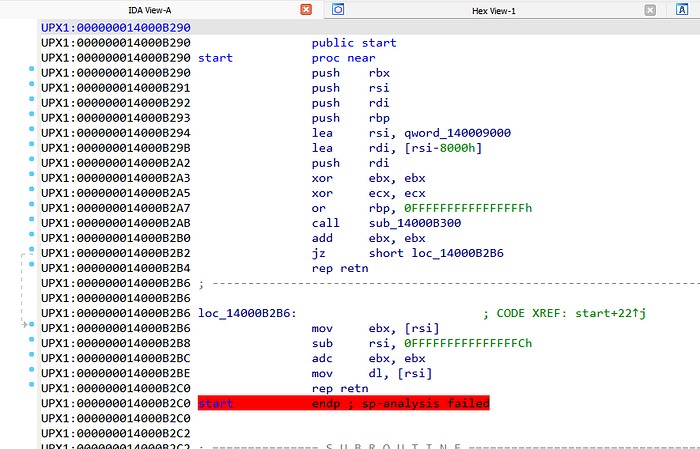
To unpack this program, we can use “upx -d packedbinary”. Because this binary is a Windows program, we should use UPX on Windows to make sure we can debug and run the unpacked program without any issues. I used this version of UPX: https://github.com/upx/upx/releases/download/v4.0.2/upx-4.0.2-win64.zip.

After unpacking, we should be able to analyze the code.
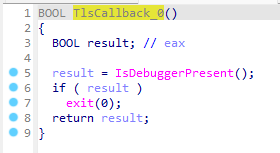
If we look at the “TlsCallback_0” function, there is anti-debugger code. This code can be patched or we can use ScyllaHide to bypass the anti-debugger.
Because the program uses a slightly complex function, I renamed the functions to make it easier to understand what is happening.
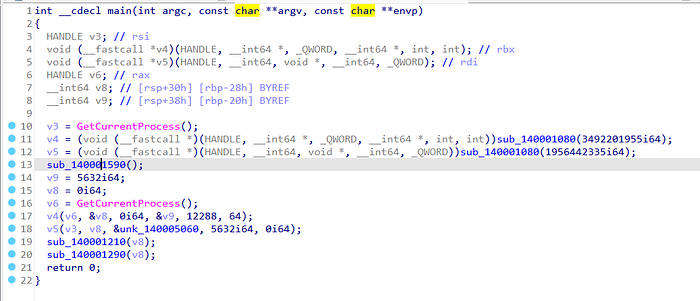
If we look at the “main” function, the program calls a function that I renamed “windowsApiResolver” with some integer value as parameter.
Below is the code of “windowsApiResolver”:
On the “windowsApiResolver,” the program receives an integer value that acts as a hash of a Windows API function name. The program would loop through all Windows API functions, calculate the hash, and check if the hash matches the target. The function would return the function address that matches the target hash.
To understand the Windows API call from the program, I created C++ code to duplicate the behavior and the hash.
The program uses the Windows API resolver three times:

- The first hash is resolved as “NtAllocateVirtualMemory”
- The second hash is resolved as “NtWriteVirtualMemory”
- The third hash is resolved as “NtQueryInformationProcess” that exists on the function “encryptAesKey”
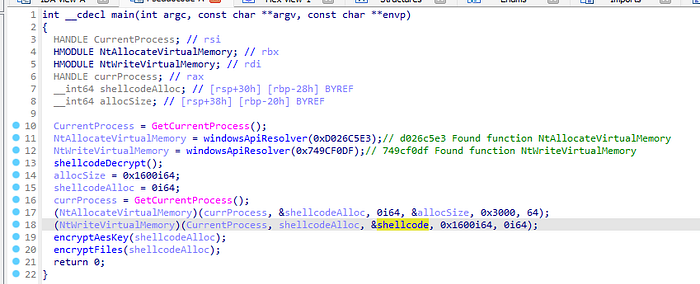
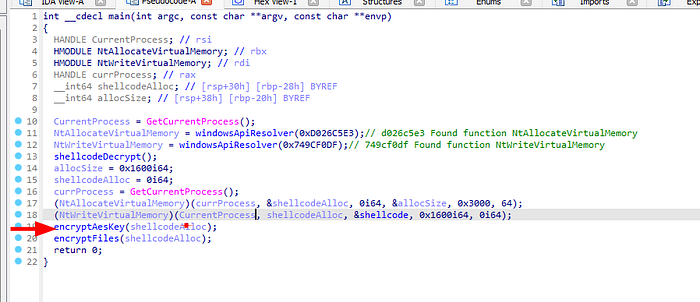
Now let’s get back to the “main” function. After resolving “NtAllocateVirtualMemory” and “NtWriteVirtualMemory,” the program executes a function that I renamed to “shellcodeDecrypt.”

If we look at this function, this function would do a XOR operation on the memory segment that was renamed to “shellcode” by 0xa6. There are two processes of XOR operation on this memory: the first using xmm register XOR and the second using normal instruction XOR.
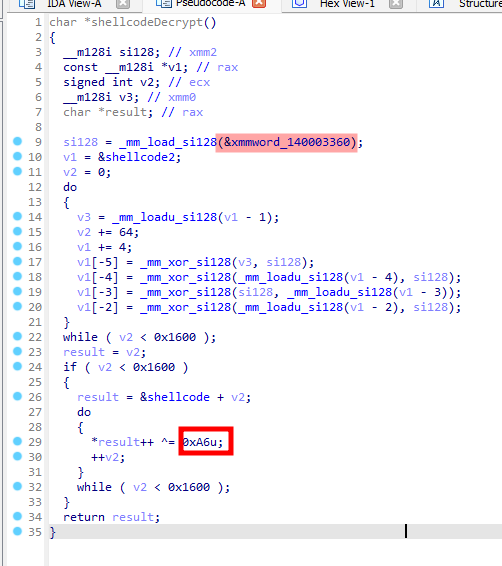
However, if we look at the variable “xmmword” that is used as the XOR key, we should see that this parameter has a value of 0a6a6a6a6a6a6a… that is actually the same as the secondary one, indicating that the first process is actually the same process as the secondary one.

Okay, now we know that the program decrypts some shellcode from memory (and later this shellcode would be used for execution flow). Now let’s extract the shellcode and save it to memory. Below is the Python script to extract the shellcode from the program and save it as a file “shellcode.”
Open this shellcode in the next decompiler window and for now, we should go back to the binary challenge.exe.
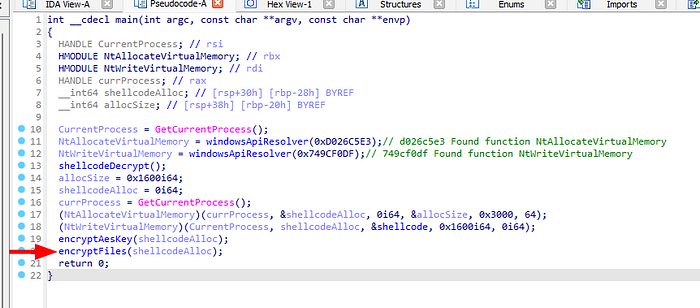
After decrypting the shellcode, the program would continue the execution by allocating memory to fill the shellcode.
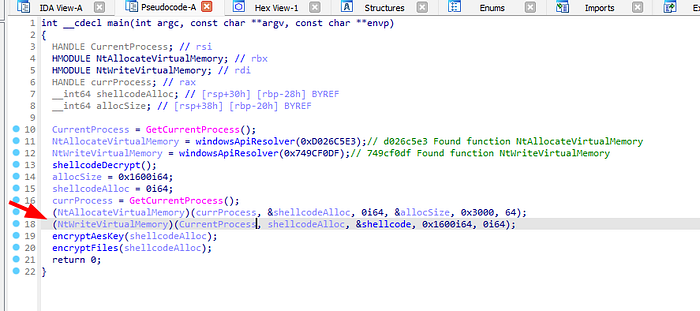
After this execution, the program would call encryptAesKey with shellcodeAlloc as memory
Let’s see the function encryptAesKey. We should see the first shellcode execution on address +4768 with parameter aesKey and integer value v5 that is supposed to be the output of NtQueryInformationProcess

Now let’s go back to the shellcode that we already opened in the secondary window and look at address 4768 or 0x12A0
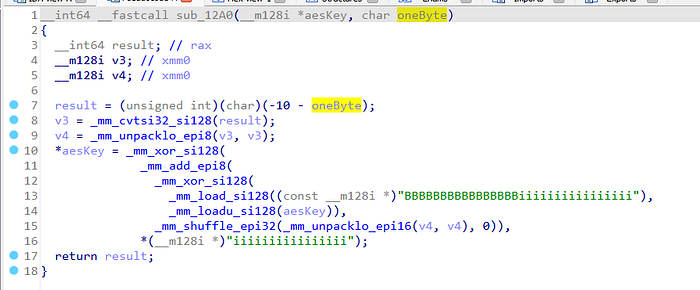
On the shellcode function on 0x12A0, the program would do some xor and add operation to aesKey with one byte of the secondary parameter. Let’s note this for now.
Now the program would do the function encryptFiles.
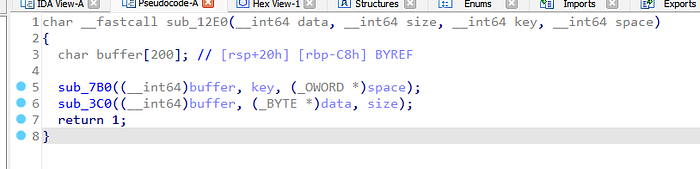
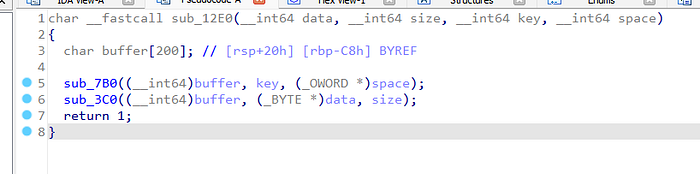
If we look at the function, The program would make a shellcode call to address 4832 or 0x12E0
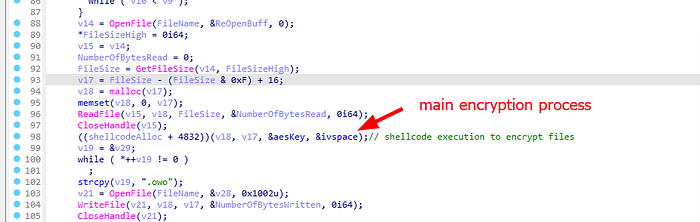
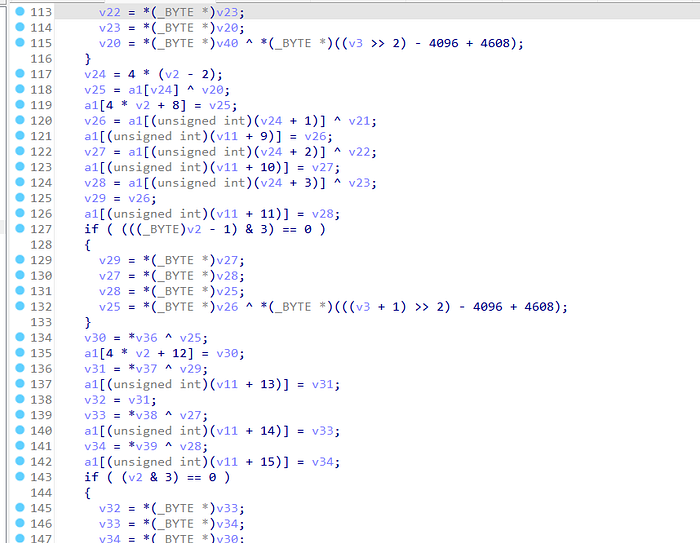
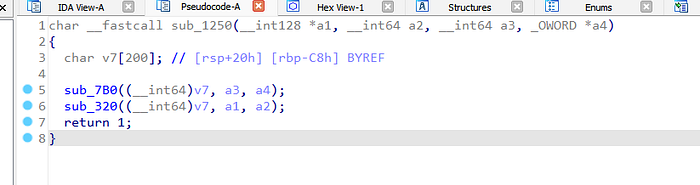
If we look at this function, there are complex encryption routines
For example, in function sub_7b0, the function calls sub_E40, which has the code below
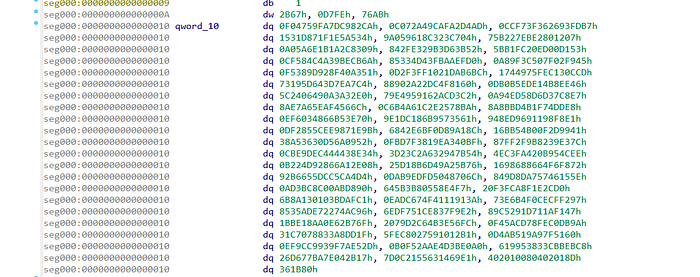
After inspecting and exploring the function, I found a constant on the program similar to AES SBox that indicates this program should be AES encryption or decryption routines.
After a while, I also found a function similar to 0x12E0 but did not called anywhere, so I indicate this function is some kind decryption routines. The function is sub_1250
After I knew there are decryption routines on the shellcode and there are functions that encrypt the AES key, I tried to call the shellcode using C++, bruteforce one-byte key that is used to encrypt the AES key (call shellcode aesEncrypt) and call shellcode decrypt to decrypt the flag file and save all bruteforced files. Below is code to implement all the algorithms.
Run the program, and the flag should be acquired on first bruteforce

Type and submit the flag, and we should get the correct flag.
Somewhat Linear
In the next challenge named Somewhat Linear, program related to audio filtering.
Below is the source code provided by the challenge:
On the challenge’s source code, the flag audio files get modified by some kind of Fourier operation. There are output impulse_response.wav and shuffled_flag.wav.
If we look at code on line 20, the code would filter impulse that had 0 values and save it as impulse_response.wav. Our flag is also filtered on line 23 and saved as shuffled_flag.wav.
Because we know the value of impulse before filtering is 0, we should be able to invert the impulse response and get the impulse response FFT, and this value can be computed to get the inverse of randomized frequency response. If this value is acquired, we can compute back the recovered audio.
Below is code to solve this challenge, not so perfect, but it works on decoding the flag audio.
Analogue Signal Processing
In the next and final challenge named Analog Signal Processing, there are two Python files: input_generator.py and circuit.py. The file’s source code can be viewed below.
On the codes, there is also an audio folder that contains 15 WAV files that are named encoded0.wav to encoded14.wav.

If we look at the code, the code does a conversion from character flag, processed with some kind of circuits and audio things, and save the output to WAV files. Each WAV file represents one flag character
Now we should analyze the encoded flag function below.
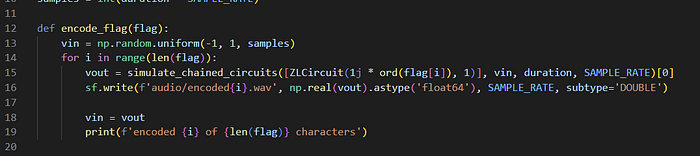
From the code, variable vin get initialized with random value. In the loop, the function ‘simulate_chained_circuits’ is executed with the first parameter ‘ZLCircuit * flag[0]’, and the second parameter is ‘vin’. The return value is saved as WAV files in ‘encoded0.wav’, and for next iteration variable vout saved to vin, and the loop continues.
This challenge provides encoded files from encoded0.wav to encoded14.wav, which means we have the value of vout data. However, we do not know the value of vin at first loop because it is randomized.
The flag format is known to be ‘HTB’, so the first character can be disregarded if we want to guess directly to next character. To guess the second character, ‘vin’ in the second loop must be the output of the first loop, which means the data in ‘encoded0.wav’.
After obtaining ‘vin’, we are be able to calculate which character satisfies the equation by brute-forcing all characters in the second loop and determining the error between the guessed character output and files from ‘encoded1.wav’. The lowest error should be the flag.
The following is the brute-force code that utilizes multithreading to brute-force the character:
In the code, specific values are printed for debugging purposes, such as the error value and character. After running for some time, the code obtains the second character of the flag, ‘T’, which satisfies the flag format.
However, after running for some time, the program failed to guess the fourth character, which was supposed to be ‘{‘, and the sixth character that program guessed as dot (.).
After discovering that the program did not display the output accurately, I took the output of error and character value on the six loops and sorted the rows based on the lowest error. The output is as follows:
In the output, the first three characters only show symbols that result in nonsensical strings. For the fourth character, there is a ‘0’ that might be a legitimate character.
Wait until the program stops, and below is the final output:
The output displays TB~p.le_dance~, After doing the minimal error analysis on the rest of the broken characters, the flag is HTB{p0le_dance}. Submit it on the platform, and we should get the points.
Epilogue
I am happy to complete all reverse engineering challenges. My favorites are Alien Saboteur challenge which involved VM reverse engineering and Vessel Cartographer which involved understanding windows api and windows shellcoding.